we always try to be mindful to offer healthy foods when we make a board for the kids, but we also appreciate the effort to find balance. that said, here are a few fun, less-healthy treats that make a great addition to any snack or shared boards during the month of october!
spooky party pretzels (jump to recipe)
skeleton skewers (jump to recipe)
monster crispies (jump to recipe)

SPOOKY PARTY PRETZELS
these are among the first fun treats i think about making as the season begins to shift…we have been making them since the very beginning! this year, i used square “snaps” pretzels for a different shape, but these are super cute on a mini pretzel shape as well.
building blocks:
(serves a crowd)
1 bag mini pretzels; square or mini pretzel shape
1-2 bags melting candy discs; white/vanilla used here but available in lots of colors too!
1 package halloween sprinkles
1 package candy eyes
directions:
(15-20+ minutes)
line a sheet pan (with lip) with parchment paper
layout pretzels flat to fill the pan; if you are making the whole bag of pretzels, you may need a second sheet pan
melt the candy discs in a microwave safe bowl, as directed + stir regularly.
transfer the melted candy to a piping bag, sandwich bag OR use a fork to drizzle candy over pretzels
add the candy eyes quickly, before candy begins to harden; here’s where we have fun with number of eyes: some monsters have 1, mummy’s have 2 tucked into their gauze, while others have 3 or more; let your kids help!
drop a few halloween sprinkles over top to make the monsters party!
let cool for ~10 minutes (or less)
break apart the pretzels slowly
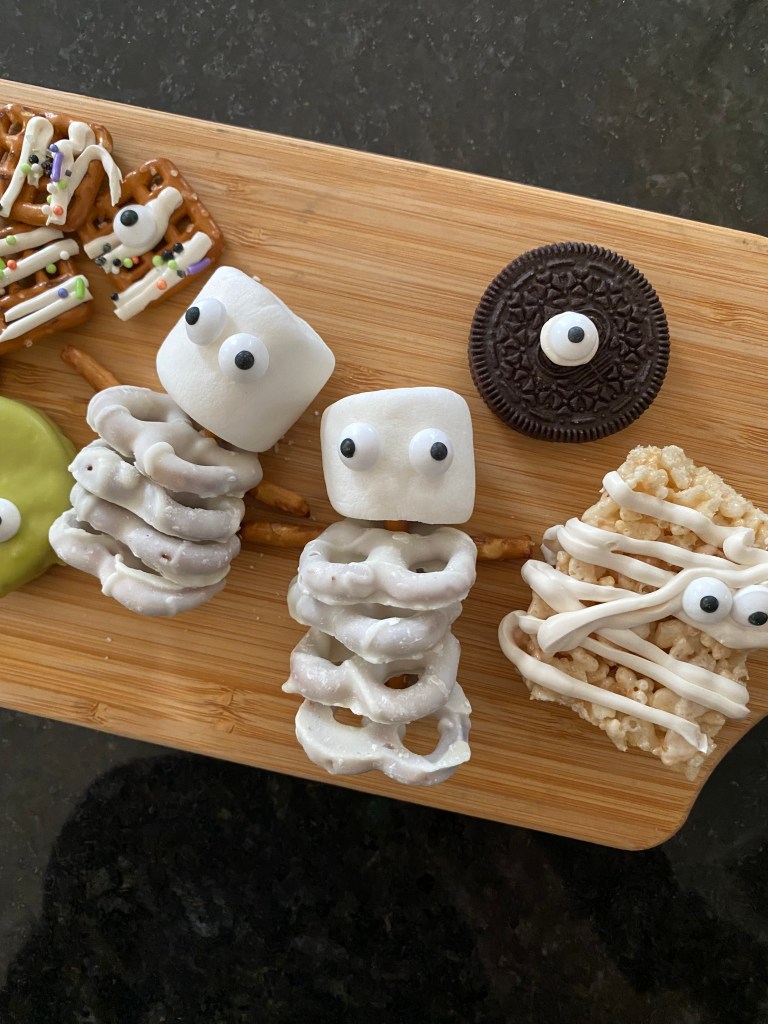
serve it up: these are fun laid out on a dessert board (pictured), in a dish of their own, or tuck them into your kids’ lunchboxes for a sweet surprise!
SKELETON SKEWERS
these were a new find for me this year! the original idea was a bit larger “skewer” + i wanted to make these small enough for kids’ hands to pickup, to fit in their lunchboxes better + to not completely overwhelm them with sugar. the toddler charcuterie take feels just right!
building blocks:
(serves 1-2+)
1 mini pretzel rod
4 white chocolate/yogurt covered pretzels make sure the back/bottom loop in open to stack on the pretzel
1 regular sized marshmallow
2 chocolate morsels mini morsels work well OR candy eyes attached with icing
directions:
(15-20+ minutes)
place 1 marshmallow at the end of a mini pretzel rod
add 4 covered pretzels gently onto the other end of the same mini pretzel rod
leave a 1/4″-1/8″ remaining of the pretzel to help it all stay together
if the “bones wiggle” a bit, it’s great–they’re skeletons!
add eyes to your liking using chocolate morsels or candy eyes; no eyes, keeps it simple + encourages a little more imagination!
serve it up: these add an amazing look to any board, as pictured + were also a complete hit in our kids’ lunchboxes this year. of all the surprises we’ve made, they requested this one on repeat (must have been the hit of sugar!)

MONSTER CRISPIES
another oldie but goodie! we’ve been making these for close to a decade + they never disappoint. i have forever been a fan of homemade rice crispy treats because the difference can be felt, tasted + smelt…there is just no substitution! making the treats is easier than you think as there is no baking needed + only a fun science experiement of melting butter together with marshmallow. my kids LOVE to help with this one! after the treats are made, adding the candy coating is also easy once you have the hang of getting it melted. don’t be scared! try these when you have some time to enjoy the process + watch your kids’ eyes light up when they say “can i taste one now!?”
building blocks:
(serves a crowd)
9″ x 13″ pan OR a smaller pan for slightly thicker treats
1/4 C butter
1 10oz bag of marshmallows; mini marshmallows preferred
51/2 C rice krispies cereal
melting candy discs in assorted colors
1 tsp cooking oil
assorted candy eyes
parchment paper for cooling
directions:
(15-20+ minutes rice crispies, 10-15 creating the monsters)
make the rice crispies treats:
prepare the 9″x13″ pan with the end of a stick of butter or line with parchment paper
melt 1/4 C butter in a sauce pan on stove top
add 10 oz. bag of marshmallows; mini marshmallows are easier to stir in, melt together faster + are less likely to spill out of the sauce pan so they are our favorite kind to use!
combine melted marshmallow mixture with rice crispies in a large bowl
pour treat mixture into the prepared pan + let cool
cut treats to remove from pan; place on parchment
OR lift parchment out of pan, transfer to counter + cut into squares/rectangles
melt the candy discs in a microwave safe bowl, as directed + stir regularly.
various colors can make this extra exciting but we reccomend only working with one at a time, it hardens fast!
dip the treats into the melted candy 1/3 of the way from the top or as desired.
drop candy eyes on before it cools; here’s where we have fun with number of eyes: some monsters have 1, mummy’s have 2 tucked into their gauze, while others have 3 or more; let your kids help!
serve it up: these are great laid out on a dessert board (pictured), stacked high on a dish or board of their own for a creepy-good afterschool surprise!
Happy Halloween!
more treats to come next year!
we hope you love the way your kids will find
their new favorite foods when they eat from a board!
when you try one of our recipes or build your
own mini charcuterie boards, please join the party,
by tagging us on instagram:
@porchesandpillowfights / @pencilandinkcreative
our boards + their elements are always
“TODDLER” TASTED, PARENT APPROVED!
happy snacking!!
–pencil + ink + marker
Discover more from toddler charcuterie
Subscribe to get the latest posts sent to your email.
